Back to Energy Manager Main Menu
Adding and managing facilities
Facilities are any location that uses or has its own utility accounts. This usually corresponds to a building or a complex of buildings. Any building that receives any type of utility bill should be added as a Facility.

Adding a new facility
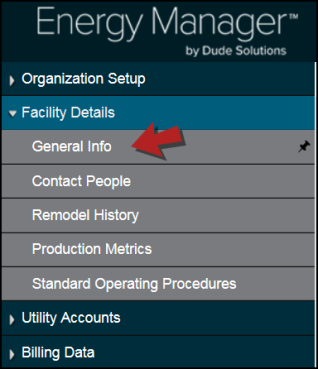
- Click on Facility Details from the navigation menu, then select General Info.
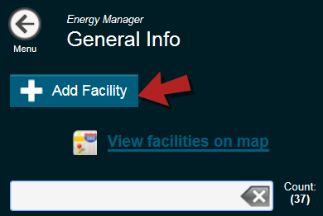
- Click +Add Facility.
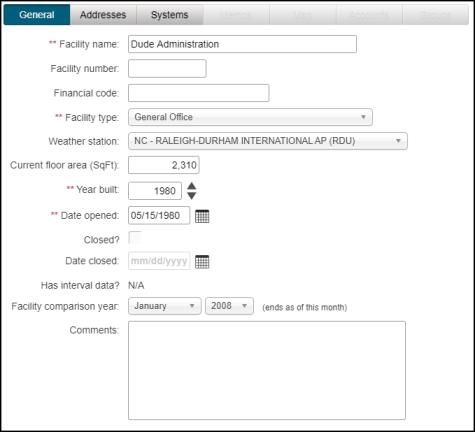
- Enter the Facility Name.
- Select the Facility Type from the drop-down list. These types come from ENERGY STAR and will determine certain factors if you decide to use Energy Manager to track and receive an ENERGY STAR rating. *Note: Options in this drop-down are predefined and cannot be edited.
- Select the appropriate Weather Station for this facility. You will want to select the weather station that is closest in proximity to your Facility, for collecting accurate temperature data.
- Enter the Current floor area of this facility. This information is used for calculating unit cost/use for reporting purposes.
- Enter the Year built and Date opened for the facility.
- Select a Facility comparison year. This is the default comparison year when running reports.
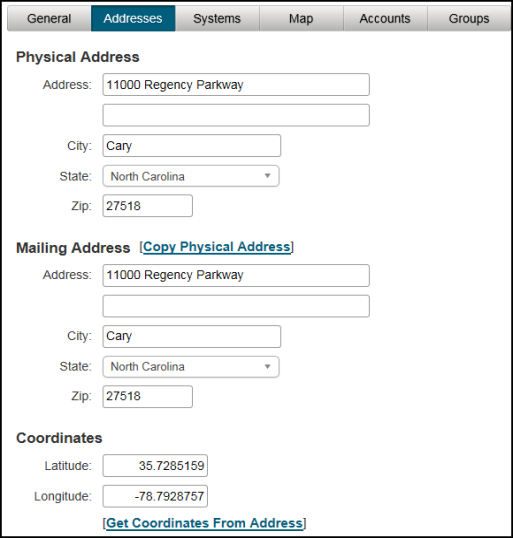
- Next, click on the Addresses tab located at the top of the screen.
- In the Physical Address field, enter the Address, City, State and Zip. This may be used for visiting a location, determining a meter location, and in Admin reports.
- In the Mailing Address, enter the Address, City, State and Zip if it is different than the Physical Address. If it is the same as the Physical Address, simply click the Copy Physical Address button.
- In the Coordinates section, click the Get Coordinates From Address button. The system will find the longitude and latitude based on the address. You will then be able to see your facility under the Map tab.
- Click Save to add this facility to your account
- A window will display asking if you would like to add another facility. If you have more than one facility to enter, then click Yes. If this the only facility you are adding at this time, then click No.
Once you have saved the facility, you will have access to additional tabs at the top of the screen.
- Click on the Systems tab to identify the primary fuel sources for the facility as well as the lighting and controls managers. This is not a required field in the system and is informational.
- The Memos tab allows you to add and view memos associated to the facility.
- Click on the Map tab to see your facility on the map based on the coordinates from the address you entered.
- The Accounts tab allows you to see the utility accounts associated to this facility. *Note: Accounts are associated with facilities when Adding an Account.
- The Groups tab allows you to see the facility groups that this facility is associated with. *Note: Facility groups are associated with facilities when Adding Facility Groups.
Documents and photos
If you have uploaded documents or photos and linked them to a facility, you can view them under the Docs & Photos tab. You can also add a file directly to the facility.
- Click on the Docs & Photos tab.
- A list of all documents and photos that have been linked to this facility will be displayed. Click on the file name to view more details.
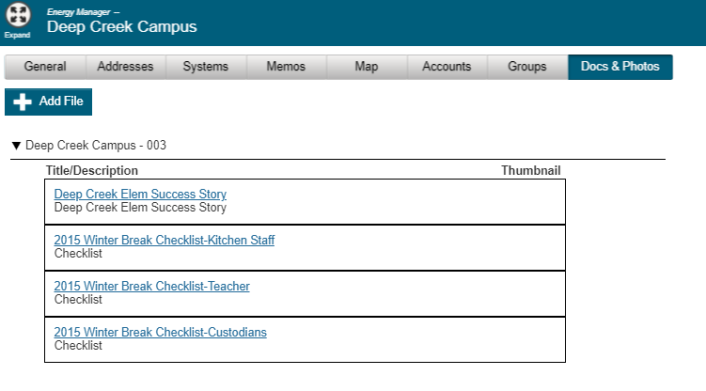
- Click the Add File button if you would like to upload a file directly to this facility.
- Enter a File title. This will display as the name of the file in the list.
- Enter a File description. This should provide more information about what is contained in the document or photo.
- Select an Account to associate to this document or photo from the drop-down menu, if necessary. *Note: Only Accounts that are associated to this Facility will display for selection.
- Select a Meter to associate to this document or photo from the drop-down menu, if necessary. *Note: Only Meters that are associated to the selected Account will display for selection.
- Click Choose File and select the document you would like to upload from your computer's hard drive. The File name, File size, and Date Uploaded fields will populate automatically.
- Click Save. The uploaded file will be added to the list of Documents & Photos, as well as this facility.
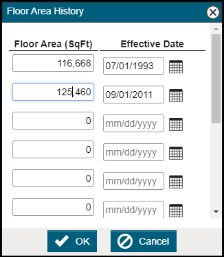
Updating facility floor area
If an addition is made or part of a building is demolished, you will need to reflect the change in Energy Manager to ensure that reporting is accurate.
- Click on Facility Details from the navigation menu, then select General Info.
- Select the facility from the list.
- Click View/Edit Floor Area History.
- In the window that displays, enter the new Floor Area and the Effective Date.
- Click OK to save your changes.
Closing a facility
When a facility closes, you have the ability to update Energy Manager to reflect the closure.
- Click on Facility Details from the navigation menu, then select General Info.
- Select the facility from the list.
- Check the box beside Closed? and enter a Date Closed.
- Click Save.
